The Configuration Window
The configuration window is where most of the action happens when it comes to customization, manual installs, testing, and debugging. Here we will cover all of the different items, tabs, fields, and buttons in detail. Let's get started.
Contents
- 1 The Main Configuration Window
- 1.1 (1) - Virtual Drive/Shortcut List
- 1.2 (2) - General tab
- 1.3 (3) - Wine tab
- 1.4 (4) - Install Components tab
- 1.5 (5) - Display tab
- 1.6 (6) - Shortcut button
- 1.7 (7) - Miscellaneous tab
- 1.8 (8) - Virtual Drive name
- 1.9 (9) - Name of shortcut in virtual drive
- 1.10 (10) - New Virtual Drive button
- 1.11 (11) - Remove Virtual Drive button
- 1.12 (12) - Virtual Drive/Shortcut name field
- 1.13 (13) - Wine Version selection
- 1.14 (14) - Debug Flags
- 1.15 (15) - Virtual Drive selection
- 1.16 (16) - Arguments field
- 2 The Wine Tab
- 3 Install Components tab
- 4 Display tab
- 5 Miscellaneous tab
The Main Configuration Window
When you first install install PlayOnLinux/PlayOnMac and try to open the Configure window, it will be blank:
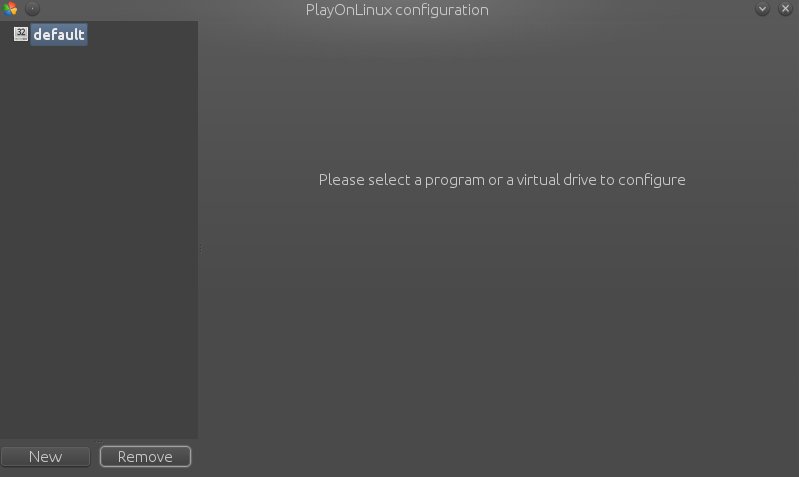
This is completely normal. It will start getting filled up after you install some software. After you install a few things, you will see more options:
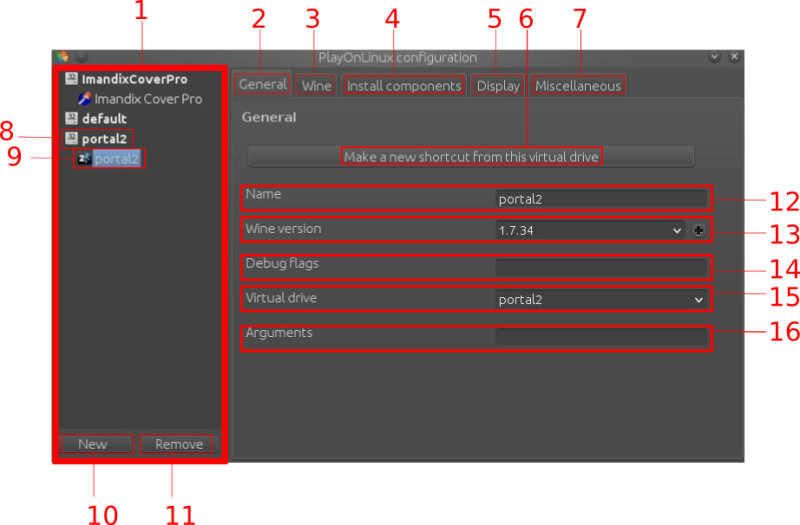
(1) - Virtual Drive/Shortcut List
For each game or application that you install, a virtual drive and a shortcut will be associated with that application. The icon next to the Virtual Drive's name is the architecture of the WINEPREFIX. It will be either 32 or 64, indicating whether it is 32-bit or 64-bit.
(2) - General tab
The general tab has a number of options available to customize the virtual drive or the actual shortcut for running the app. This will be covered more in a moment. This is the default tab that you will see when highlighting a virtual drive or a shortcut.
(3) - Wine tab
This tab gives you quite a few options for configuring Wine itself. Any configuration done here is specific to the virtual drive or virtual drive of the shortcut highlighted in the Virtual Drive List.
(4) - Install Components tab
Install Components gives you access to a ton of dependencies that might be need to run applications through Wine. This includes .NET, DirectX, Microsoft Fonts, and much, much more. This list is covered in detail here.
(5) - Display tab
This is where you will be able to change to modify some of the registry entries for Wine's graphics support without actually going to the registry. Disable/Enable GLSL support, reported video memory size, etc..
(6) - Shortcut button
Clicking this button will search for .exe files in the selected virtual drive, and present you with a list of executables to create a shortcut from. You are also given an option to manually browse for an .exe.
(7) - Miscellaneous tab
Other features that do not fit into other categories. Running an .exe in the selected virtual drive, opening the POL Shell and virtual drive's directory, Mouse warp override options are found here.
(8) - Virtual Drive name
The name of the virtual drive.
(9) - Name of shortcut in virtual drive
The name of a shortcut contained within that virtual drive. You can have as many or as few as you would like. It is not uncommon to have multiple shortcuts, especially for manual installs or virtual drives with multiple apps installed.
(10) - New Virtual Drive button
This button opens a dialogue to create a new virtual drive. Useful for manual installs and testing. Please note that you will need to already have a POL WineBuild installed (Tools -> Manage Wine Versions) to use this function correctly.
(11) - Remove Virtual Drive button
Click to delete the highlighted virtual drive. Use this with caution, as everything that is in the virtual drive will be deleted.
(12) - Virtual Drive/Shortcut name field
Depending on what you have highlighted (either a shortcut or a virtual drive), this will show you the name of it and allow you to modify it. It is recommended not to alter the virtual drive name once created, though the shortcut name is fine to customize in most cases.
(13) - Wine Version selection
A dropdown menu containing a list of installed Wine versions available for use in this virtual drive. Whichever is listed initially is the Wine versions in use in the highlighted virtual drive. The "plus" button allows you to open the Manage Wine Versions dialogue directly from this tab.
(14) - Debug Flags
These are debug flags to be used when launching a POL-installed application in Debug Mode. Debug Mode is covered in more detail here:
(15) - Virtual Drive selection
When a shortcut is highlighted, this will allow you to assign the shortcut to a virtual drive. Whatever is initially listed is the current home of that shortcut.
(16) - Arguments field
When a shortcut is highlighted, this allows you to append command-line arguments to the executable that the shortcut links to. Useful for adding commanding-line options to a game's executable to enable in-game options and things like that.
The Wine Tab
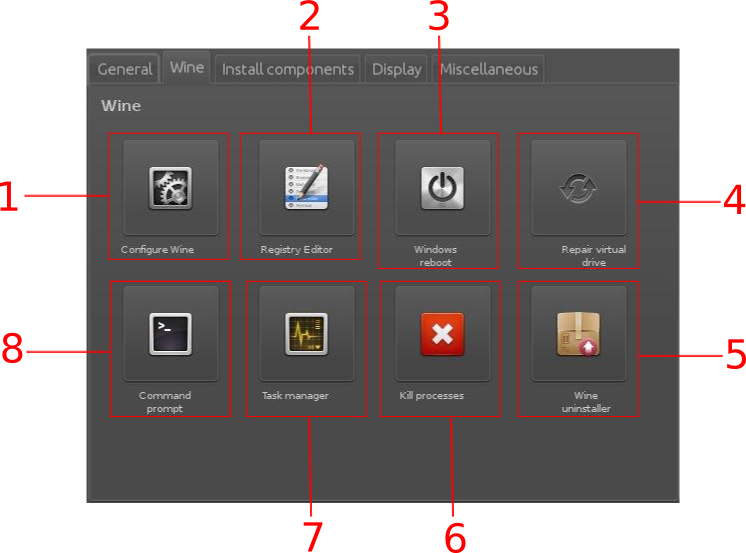
(1) - Configure Wine
This opens winecfg in the selected virtual drive. This is where you can set the version of Windows for the virtual drive, as well as set the virtual desktop settings and disks reported to Wine. For more information, check here.
(2) - Registry Editor
Open up the Wine registry editor. Used for manually manipulating the Wine registry. For more information, check here.
(3) - Windows Reboot
Simply emulate a Windows reboot. Required by some applications during install.
(4) - Repair virtual drive
Essentially runs the process for creating a new virtual drive in the highlighted virtual drive. This is used in case the virtual drive fails to build correctly, or if a component/dependency for Wine fails to install or download correctly.
(5) - Wine uninstaller
A tool for uninstalling certain components out of a virtual drive, like Gecko, wine-mono, etc.. For more information, check here.
(6) - Kill processes
Kills all processes in virtual drive.
(7) - Task manager
Opens the Wine task manager, which is similar to the one found in Windows, in the highlighted virtual drive.
(8) - Command prompt
Opens a command prompt that emulates the Windows command prompt in the highlighted virtual drive. http://wiki.winehq.org/cmd
Install Components tab
This tab is where you will find dependencies to install. It is very similar to the functions in winetricks, giving you the ability to automatically install dependencies that may be needed by Wine for certain applications.
The sheer complexity, size, and detail of this tab's content necessitates an entire section unto itself. That section can be viewed here:
Display tab
The Display tab gives you access to certain options that usually need to be set in the registry by hand. Off-screen rendering, GLSL support, and other options are found here.
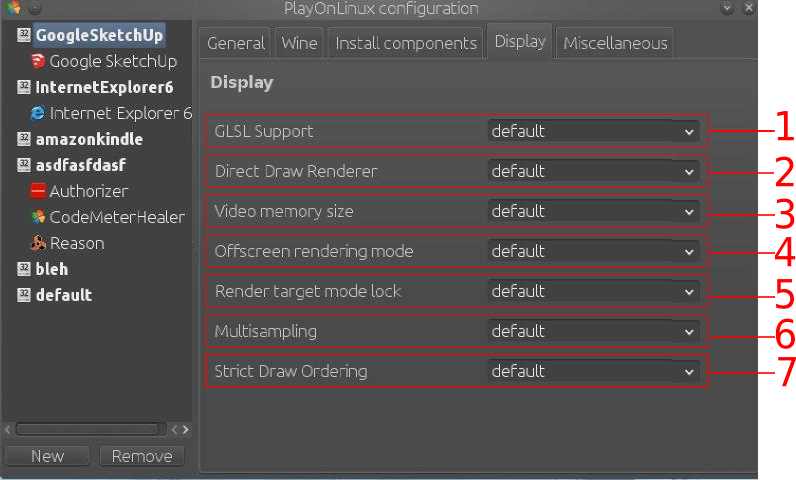
(1) - GLSL Support
GLSL is the OpenGL Shading Language (Wikipedia).
Available options:
- default
- enabled
- disabled
(2) - Direct Draw Renderer
Selects which ddraw renderer the backend should use.
Available options:
- default - OpenGL is the default setting
- gdi - Used for legacy reasons or if bugs exist in the OpenGL renderer
- opengl - Tells the backend to use OpenGL
(3) - Video memory size
Sets the amount of reported video memory (RAM) on your video card.
Available options:
- default - Simple auto-detection based on card type guessed from OpenGL capabilities
- list of common memory sizes
(4) - Offscreen rendering mode
Avoids the depth buffer to copy between offscreen and onscreen targets. Introduces fallbacks in some drivers and exposes bugs in others.
Available options (ref):
- default - fbo is the default setting
- fbo (Framebuffer object)
- backbuffer - Render offscreen render targets in the backbuffer
- pbuffer - Hardware accelerated rendering to an off-screen buffer, possibly with pixel formats which aren't normally supported by the X display
On Wikipedia you may read about Multiple buffering.
(5) - Render target mode lock
Selects which mode is used for onscreen render targets.
Available options:
- default - Readtex is the default setting
- disabled - Disables render target locking
- readdraw - Uses glReadPixels for reading and writing
- readtex - Reads by glReadPixels, writes by drawing a textured quad
(6) - Multisampling
Mostly used for legacy options (games up to 1990's). It it no longer necessary to use any of the options.
Available options:
- default
- enabled
- disabled
(7) - Strict Draw Ordering
Ensures any pending drawing operations are sent to the drivers at the cost of performance (frames per second).
Available options:
- default
- enabled
- disabled
Miscellaneous tab
The Miscellaneous tab provides functions that otherwise have no other proper place. These include opening up a POL shell in your default terminal, prefixing commands to shortcuts, and more.
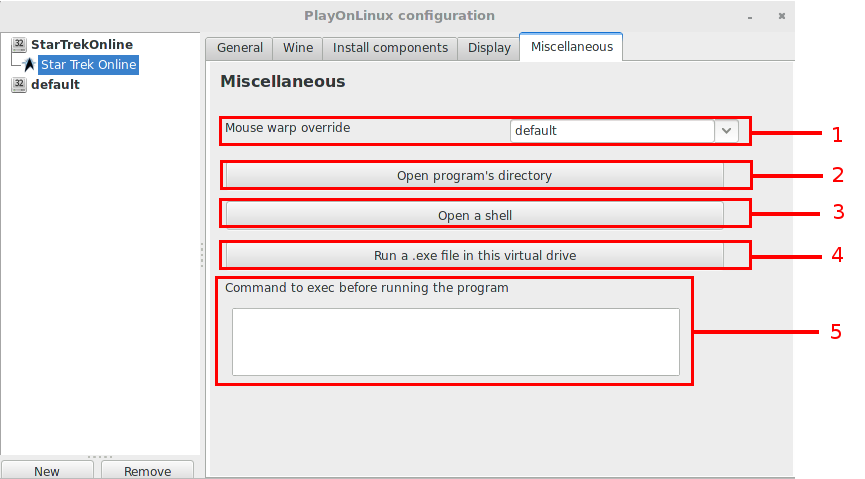
(1) - Mouse warp override
Some games have issues with the mouse. This option has been known to correct this glitch in a lot of games.
Available options:
- default (enable)
- enable
- disable
- force
(2) - Enter program's virtual drive or directory
Depending on what is highlighted on the left:
A: If the virtual drive is highlighted, you can open the virtual drive's directory in your system's default file browser
or
B: If the program shortcut is highlighted, you can open up the folder that the shortcut's executable file is located at in your system's default file browser
(3) - Open a shell
Open up your system's default terminal under the context of the virtual drive or program highlighted. You will have full access to the POL scripting API calls from there, as well as already be sandboxed within that virtual drive.
(4) - Run a .exe in this virtual drive
Allows you to run an .exe or .msi file within the context of the virtual drive or program highlighted. Will use whatever WineBuild is attached to that particular virtual drive, as well as sandboxing any action that happens therein.
(5) - Command to exec before running the program
When a program shortcut is highlighted, you can use this box to prefix commands to the shortcut. Handy in, say, the case of laptops with Nvidia and Intel graphics, and you need to use prefix primusrun or optirun before starting a particular game.